Oh my goodness, I don't know about you but there is still so much to do to get ready for Christmas. I cannot believe we have less than a week to go. Why do we put some much pressure on ourselves.
Well now is a great time to do some crafting, I find it a great way to relax or de-stress. I must have been having too much fun crafting this time with the ScrapPacks as I did more layouts than would fit in the newsletter, so here is the extra layout that I created.
On this layout I used the Christmas ScrapPack from Better Scrapbooking - available from the online shop (click here to order yours).
I used the Authentique Joyous collection Decorate pattern paper for the background then added some Bazzill Celery cardstock and a strip of Authentique Joyous collection Intent pattern paper across the page. I also double matted my to photo as the family along the bottom were listening to her classical guitar playing - one of our family traditions at Christmas. There were no die-cut titles about listening to guitar music so instead I used the Sleigh Bells Ring, are you Listening? die-cut for a bit of fun.
The big vacant area in the top left corner is so you can either add some journaling or a larger title that you have cut out using your own die-cut machines.
Well I hope you all have a wonderful Christmas and an even better 2014.
I am looking forward to sharing lots more ideas and tips next year.
So until then, everyone have a safe and happy holiday, wherever you are
Tuesday, December 17, 2013
Sunday, December 1, 2013
File Folder Mini Book
File folders are proving to be really popular in scrapbooking. You can use it on your layout to create more space for photos and to give an interactive element to your layout.
But here is a fun way you can use a couple of file folders to create a sweet little mini album for yourself to give to someone special.
To start with you are going to need:
2x File Folders - you can either have them the same size or one smaller than the other.
1x Scrap cardstock - mine is 5 3/4"x 2 " (it needs to bit a bit shorter than the smaller file folder - or file folder of choice for inside pages of your mini book)
Adhesive
Take the scrap piece of cardstock and fold it in half
Adhere this scrap piece of cardstock to the back of the smaller file folder as shown.
Now you have your mini album cover and pages.
Now you can go ahead and start adding photos and other fun embellishments.
I will show you how this turns out later this week, but this has been fun so far. Have fun making mini books using file folders.
But here is a fun way you can use a couple of file folders to create a sweet little mini album for yourself to give to someone special.
To start with you are going to need:
2x File Folders - you can either have them the same size or one smaller than the other.
1x Scrap cardstock - mine is 5 3/4"x 2 " (it needs to bit a bit shorter than the smaller file folder - or file folder of choice for inside pages of your mini book)
Adhesive
Take the scrap piece of cardstock and fold it in half
Adhere this scrap piece of cardstock to the back of the smaller file folder as shown.
Now you have your mini album cover and pages.
Now you can go ahead and start adding photos and other fun embellishments.
I will show you how this turns out later this week, but this has been fun so far. Have fun making mini books using file folders.
Friday, November 29, 2013
A couple of ideas for those Buttons
I am so sorry it has been so long since I last blogged. If it is not one thing it is another.
I have had birthdays, craft shows, classes and so much more happening. So time to put excuses aside and get writing and sharing - here we go.
In my latest newsletter I talk about using buttons on your layouts. But I found I did not have enough room to share these two ideas I have had a play with using buttons and so thought it would be fun to share them here instead.
Buttons come in such beautiful colours and designs these days, so why not use them where ever you can. Here are two ways you can use them today!
Aren't these so cute. Here I have just used some wooden clothes pegs and a large paper clip. With the clothes pegs I have added pattern paper to the flat sides of the pegs and then glued in place a fancy button.
Both of these buttons had shanks on the back. These were easily taken care of by using a pair of wire cutter and just cutting them off. Remember however to either cup your spare hand slightly over the button as you cut as the shanks do go flying and you do not want it flying in your face.
With the paper clip I simply adhered it to a flat button. You can add some bakers twine to the flat button before adhering if you like for further detail. Once dry the paper clip can be used as a fun little book mark.
On the backs of the clothes pegs you may like to adhere a magnet, then you can use them to pin notes to your refrigerator.
I hope these two ideas spark more ideas for you to try with buttons.
Happy crafting
I have had birthdays, craft shows, classes and so much more happening. So time to put excuses aside and get writing and sharing - here we go.
In my latest newsletter I talk about using buttons on your layouts. But I found I did not have enough room to share these two ideas I have had a play with using buttons and so thought it would be fun to share them here instead.
Buttons come in such beautiful colours and designs these days, so why not use them where ever you can. Here are two ways you can use them today!
Aren't these so cute. Here I have just used some wooden clothes pegs and a large paper clip. With the clothes pegs I have added pattern paper to the flat sides of the pegs and then glued in place a fancy button.
Both of these buttons had shanks on the back. These were easily taken care of by using a pair of wire cutter and just cutting them off. Remember however to either cup your spare hand slightly over the button as you cut as the shanks do go flying and you do not want it flying in your face.
With the paper clip I simply adhered it to a flat button. You can add some bakers twine to the flat button before adhering if you like for further detail. Once dry the paper clip can be used as a fun little book mark.
On the backs of the clothes pegs you may like to adhere a magnet, then you can use them to pin notes to your refrigerator.
I hope these two ideas spark more ideas for you to try with buttons.
Happy crafting
Thursday, October 17, 2013
Making Spiders
Well with it being Halloween shortly I thought it would be fun to show you a fun we embellishment you can create for your layouts, cards or even your windows.
You Will Need:
Black cardstock
White cardstock
1 1/4" scallop circle punch
photo corner punch
1/2" circle punch
Black bling or pearls
For each spider you will need to punch:
1 black 1 1/4" scallop circle
4 black photo corners
2 white 1/2" circles
To create the legs of your spider, firstly cut any decorative piece away from your photo corner punches
Now cut each photo corner down the middle so you end up with 8 thin corners
Adhere these to the back of your scallop circle.
Once yours legs are adhered in place you may wish to trim them down slightly.
Add black bling/pearls to your white 1/2" circles
Adhere the two white circles with bling/pearls for eyes to the front of the scallop circle.
Add your finished spider to your project.
You Will Need:
Black cardstock
White cardstock
1 1/4" scallop circle punch
photo corner punch
1/2" circle punch
Black bling or pearls
For each spider you will need to punch:
1 black 1 1/4" scallop circle
4 black photo corners
2 white 1/2" circles
To create the legs of your spider, firstly cut any decorative piece away from your photo corner punches
Now cut each photo corner down the middle so you end up with 8 thin corners
Adhere these to the back of your scallop circle.
Once yours legs are adhered in place you may wish to trim them down slightly.
Add black bling/pearls to your white 1/2" circles
Adhere the two white circles with bling/pearls for eyes to the front of the scallop circle.
Add your finished spider to your project.
Have fun creating and displaying your cute little spiders. If you play around with the placement of the bling for the eyes you can get some really funny expressions for your spider.
Happy Scrappin
Wednesday, September 4, 2013
So excited ...
It's here, it's here, it's here!!!!
You may have seen that line above on my facebook during the week. Well it all started a couple of years ago when I was able to borrow my step-mother's Cricut machine and realized how much fun an electronic die-cut machine was. Well I had to give back my step-mother's Cricut over a year ago now. Since then I discovered another electronic die-cut machine ... the Silhouette Cameo.
It looked just like what I was wanting. I wanted something that I could design my own images and cut them out. Also not to be restricted to purchase cartridges but to purchase images as and when I wanted them and build up my own library of images. It also needed to be able to hook up to the computer. The Silhouette Cameo does all this. So a couple of months ago I put my order in for one ...
On Tuesday this week it finally arrived!
I was literally bouncing round my office. Luckily my daughter Grace was home so as I unpacked my new machine she took lots of photos.
So then came the working out how to use it. I had to wait for Brad to get home so he could find a NZ plug for it and then the magic began. I cut out just a couple of quick sample shapes. Nothing worth showing LOL!
But last night my daughter Melissa picked up a gift for a friend of hers so we made a cute little gift bag using the Silhouette Cameo.
It is cute!
So now to find all my layouts that need titles. I know I left some without titles so I could do them once my Silhouette Cameo arrived, but do you think I can find them. Oh well what a shame I might just have to do some more scrapbooking :)
Happy Scrappin' everyone!
You may have seen that line above on my facebook during the week. Well it all started a couple of years ago when I was able to borrow my step-mother's Cricut machine and realized how much fun an electronic die-cut machine was. Well I had to give back my step-mother's Cricut over a year ago now. Since then I discovered another electronic die-cut machine ... the Silhouette Cameo.
It looked just like what I was wanting. I wanted something that I could design my own images and cut them out. Also not to be restricted to purchase cartridges but to purchase images as and when I wanted them and build up my own library of images. It also needed to be able to hook up to the computer. The Silhouette Cameo does all this. So a couple of months ago I put my order in for one ...
On Tuesday this week it finally arrived!
I was literally bouncing round my office. Luckily my daughter Grace was home so as I unpacked my new machine she took lots of photos.
![]() |
| Getting it out of the shipping box was hard, it was a tight fit, but worth it |
![]() |
| Opening the box and discovering. Notice that cat couldn't care less. |
![]() |
| Lifting it out, so exciting |
![]() |
| Taking the packaging off the Silhouette - so much tape |
![]() |
| Finally I can open it. And guess what, there was more tape. |
![]() |
| Removing the last piece of tape from the blade holder. |
![]() |
| And here she is, in all her glory Ta-da! |
But last night my daughter Melissa picked up a gift for a friend of hers so we made a cute little gift bag using the Silhouette Cameo.
It is cute!
So now to find all my layouts that need titles. I know I left some without titles so I could do them once my Silhouette Cameo arrived, but do you think I can find them. Oh well what a shame I might just have to do some more scrapbooking :)
Happy Scrappin' everyone!
Wednesday, August 28, 2013
Steampunk Paint Brush
I mentioned earlier this week that I was spray painting a paint brush.
I know some of you were thinking I had lost my marbles, and with the smell in my office this week from the spray painting (even though I did the painting outside), I just may have lost a couple LOL!
Anyway, I was inspired by the Green Bay High School production of The Electric Empire Adventure as it was done in a Steam-punk theme. Well since then I have been wanting to do a mixed media project using Steam-punk. I was on Pinterest one day and came across a paintbrush someone had done and figured, "I could do that" With that Grace and I went widget shopping and found lots of cool little goodies in unexpected places. A big thank you to the Waitakere Avanti Bike shop that was kind enough to help us out with all sorts of little goodies.
Well here is my end result:
I spray painted my paint brush copper, this took two coats, front and back. Not don't do spray painting if there is even a breath of a breeze in the air.
I then spray painted some cogs and widgets with gold spray paint.
To adhere everything in place I used the wonderful Glossy Accents.
Now all I need to do is think what to do with it now. I think I will display it somewhere in my office :)
I know some of you were thinking I had lost my marbles, and with the smell in my office this week from the spray painting (even though I did the painting outside), I just may have lost a couple LOL!
Anyway, I was inspired by the Green Bay High School production of The Electric Empire Adventure as it was done in a Steam-punk theme. Well since then I have been wanting to do a mixed media project using Steam-punk. I was on Pinterest one day and came across a paintbrush someone had done and figured, "I could do that" With that Grace and I went widget shopping and found lots of cool little goodies in unexpected places. A big thank you to the Waitakere Avanti Bike shop that was kind enough to help us out with all sorts of little goodies.
Well here is my end result:
I spray painted my paint brush copper, this took two coats, front and back. Not don't do spray painting if there is even a breath of a breeze in the air.
I then spray painted some cogs and widgets with gold spray paint.
To adhere everything in place I used the wonderful Glossy Accents.
Now all I need to do is think what to do with it now. I think I will display it somewhere in my office :)
Wednesday, August 21, 2013
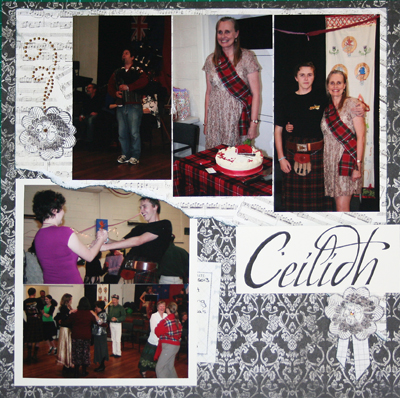
Dancing at the Ceilidh
I have been working hard this week with layouts for the next ScrapPack. I decided with all the left over bits and bobs to create another layout and share that with you so you can get an idea of the ScrapPack without giving away the layouts that will be in the next newsletter.
We were invited to celebrate a friends 60th birthday at a wonderful Ceilidh. Oh my goodness my girls and I had not been to a Ceilidh before (and for those of you not sure what this is, it is an Irish/Celtic social dancing.)
Wow, it was full of energy, joyful laughter, clapping and singing. It was an amazing night, I haven't been to something as fun as that since I was a kid. Both Grace and Melissa were on the dance floor pretty much all night. I sat on the sidelines taking photos, clapping and whooping with the best of them.
I felt that papers from the Authentique Irresistible range were perfect for this layout. Here is a close up of a couple of elements:
For both of these I have cut out some flowers and layered them. One was layered over some bling swirls I found in my stash. The second I just layered and added some paper 'ribbons' underneath. I also added a bling to the centers of each flower.
I also hid a journaling block that I attached to some cardstock so I had more journaling space on the back.
I really like this layout. Let me know what you think in the comments below :)
Happy scrappin'
Thursday, August 15, 2013
From M&M Container to Bits & Bobs Storage
My youngest daughter likes to collect the new M&M chocolate containers. They are very cute, but I was sure I could make them even cuter by adding some paper, ink and stickers. Sure enough Melissa let me have one of her many containers and this is what happened during one of my crafting sessions last weekend.
Decorating the side of the container was easy as it is flat, so I just grabbed some left over paper paper, cardstock and stickers from my scraps pile (we all have at least one pile) and added them to the side of this container.
The top of the container was more of a challenge as it is not only curved but had a funny face on it that did not go with the rest of my newly decorated container.
To cover it I cut a 21/2" circle from cardstock and then cut out a small pie-like piece as shown in the picture below.
I took some white liquid glue and put it all over the top of the container. The next step is probably the most important, I took the cardstock circle piece and carefully scrunched it up. This broke some of the fibres in the paper allowing it to be more mold-able when adding to the top of the container.
Next I added the cardstock piece to the top of the container. Because I had that small piece cut out it was easy to mold it to the shape of the top of the container without having any pleats or creases. Just don't cut out a too big a piece of the pie, if just needs to be a slither.
I hope you get some time this weekend to be crafty :)
Happy Scrappin'
Wednesday, August 7, 2013
Mini Luggage Box Tutorial
You will need:
1x 71/2”x 41/4” plain cardstock (colour of your choice)
1x 8”x 31/2” Bazzill Two Scoops cardstock (colour of your choice)
2x 1/4”x 12” strip of brown cardstock
2x small brads (colour your choice)
Instructions:
Using the pattern score and cut your 71/2”x 41/4” cardstock.
Adhere the flaps to the inside of the box, then adhere the end flap over to hide the flaps you just adhered.
Score and fold your 8”x 31/2” of Bazzill Two Scoops cardstock. Do not adhere together just yet.
Take the two 1/4” strips and adhere them about 1/2” up from each of the long sides - being sure to add the score marks as you go, this will make it easier to fold and adhere together.
Trim off excess - but DO NOT throw them away.
To make the handle
Cut a piece from your left over 1/4” brown stripes so it is just a bit longer than the space in between to two brown straps on your scored luggage wrap-a-round.
Punch a hole in each end of your handle and two holes on one end of your luggage wrap-a-round, attach your handle using your two brads.
Now you can adhere your wrap-a-round together being sure the handle is on the outside edge.
Slide your box into its wrap-a-round. You have your own little luggage bag. Use this as a party favour, mini first aid kit, a survival kit of chocolate, the ideas are endless.
Mini Luggage Box
I mentioned in the last G&T that I would be putting something on the blog by today about the cute little mini luggage box.
There are so many things you can use this cute little box for. You can use it to give a wee gift, maybe chocolate or jewelry.
You may like to use some different colours and create a little first aid kit. Maybe even a survival kit (remember chocolate is necessary to survive LOL!). How about to give little gift cards or tags.
For the outside of this box I have used the Bazzill Two Scoops Cookies and Cream paper. With this paper you could even add some distressed looks with your sandpaper or distresser tool.
Be sure to drop by tomorrow afternoon for the instructions.
I will post on Facebook once the instructions are up.
This is such a cute little box and so easy to create. I will show you in this entry the box and tomorrow I will upload the finished instructions, I am just waiting on getting the pattern drawn for you to follow.
Anyway, here is this cute little box -
It measures 2 1/2" x 3 1/2"There are so many things you can use this cute little box for. You can use it to give a wee gift, maybe chocolate or jewelry.
You may like to use some different colours and create a little first aid kit. Maybe even a survival kit (remember chocolate is necessary to survive LOL!). How about to give little gift cards or tags.
For the outside of this box I have used the Bazzill Two Scoops Cookies and Cream paper. With this paper you could even add some distressed looks with your sandpaper or distresser tool.
Be sure to drop by tomorrow afternoon for the instructions.
I will post on Facebook once the instructions are up.
Subscribe to:
Posts (Atom)