Pages

Monday, November 26, 2012

Christmas Tags


Every year I like to hand make my Christmas gift tags.  Usually I wait until I have some wrapped gifts ready for going under the tree.  This year I have decided to try and be a bit more organised so I have made my gift tags already.  I may have gone over board with the amount but I always seem to run out.

So here is what I did:
I die-cut loads of gift tags, punched circles in green and red, then punched a herd of reindeer.  I layered these with the reindeer on foam tape for some dimension.  Then I added red bling for the nose (I was going to use glitter but this was way faster, much better)  and lastly I added some red bakers twine.

Very pleased with the way they have turned out!

Do you make gift tags for your Christmas gifts?  I would love to see what you create.  Feel free to share your tags with me.


Scrapbooking Layout Boy Discovers World by Jennie Coull

Here is a layout Jennie has created for our newsletter using the ScrapPack
This is a video Jennie showing her creative process for this layout.

Scrapbooking Layout Dad by Jennie Coull

Here is a layout Jennie has created for our newsletter using the ScrapPack.
This is a video Jennie created showing her creative process for this layout

Scrapbooking Layout 1st Day by Jennie Coull

Here is a layout that Jennie has create for this months newsletter using the latest ScrapPack.
 This is a video Jennie created showing her creative process for this layout.


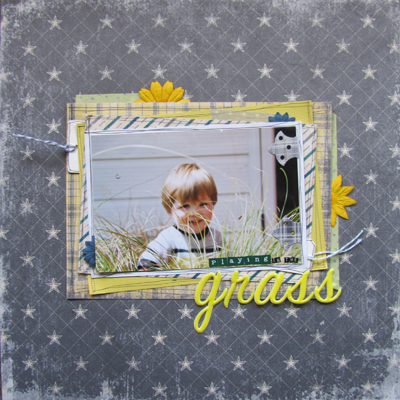
Scrapbooking Layout Playing in the Grass by Jennie Coull

Here is one of the layouts Jennie has kindly created for our newsletter using this months ScrapPack.
This is a video Jennie created as she put this layout together so you can see how she did it and use some of this process to create a similar layout for yourself.

Wednesday, November 14, 2012

Diamond Fold Card Base


 This week I have been having fun with this months Spectrum Noir Monthly Kit.  This month we have been working with the set of blue pens.  With this kit there was a really fun diamond folded card (the I made the base and included in the kits).  I thought you would all like to see how to make this fun card.  Truly it is really easy to make.
To make just the base of this card you will need:
1 piece of 4"x12" cardstock or pattern paper of your choice
Scoreboard

Instructions:
Place your strip of 4"x 12" cardstock or pattern paper onto your scoreboard so that it is long ways and score at 2",4", 8" and 10"
Mark on your paper where 6" is at the top and bottom of your paper
Take your paper strip off your scoreboard and turn in over.  Take one side and fold so the top edge lines up with the 6" markings.
Now fold so the other half of the top edge lines up with the 6" markings and looks like the photo above.
Turn your paper 180 degrees and repeat the last two steps.
Turn your paper so the right side is showing and fold up at the 2" and 10" score lines   Your paper will naturally want to start making the diamond in the middle now.
Pinch beside your diamond to help fold back the edges of the paper to define your diamond.
This is how your finished base should look.  You can now decorate it wish plain papers and stamped images and other fun embellishments.

I would love to see what you create using this card folding technique.  You can email through your photos to: megan@betterscrapbooking.co.nz

Happy card making everyone!

Graduation

It has been a little while since I have posted.  Sorry about that, seems like we have been pretty busy with birthdays (still one to come this weekend), and life in general lately.  We have had a special event that does not happen very often.  Last week my eldest daughter graduated High School.

It felt so strange for them to be breaking up for the end of the year and for the end of year exams and to be having their graduation.  This year has truly flown by.  We have ... ok let's rephrase that ... she has been very aware this year was to be her final year at high school, but it still came to soon (for many of us).

I have to say I have been very impressed with our high school - Green Bay High School.  We have had a very positive time there.  I like that the teachers are more often than not, there for the kids.  Wanting the kids to do their best.  Having a really good variety of subjects available and willing to help accommodate students needs wherever they could.

Thankfully, my youngest daughter is having her first year of high school at the same school this year, so we have another four more (positive) years to come.
 Grace receiving her graduation certificate.
 Grace and her lovely form teacher of 5 years.  Thank you Gail for everything.
Grace and her Dean Mr Woodward.  Thank Mr Woodward for being available to all the kids over the past 5 years.  We wish you all the best for the next year and all the challenges it brings.

Wednesday, October 17, 2012

Baby layout Video using new Pavlova Papers


I just remembered this video that I managed to do this month and thought I should share it here on my blog.  I had so much fun putting this together.  So lovely to work with some older photos of my youngest daughter.

I hope you enjoy this video!
Please leave a comment below and let me know what you think.

The papers I used here were:
Pavlova Papers - Pink Daisies
$2.30 per sheet
Click here to order yours!
Also available in blue
Pavlova Papers - Owl Family Pink
$2.30 per sheet
Click here to order yours!
Also available in blue
Pavlova Papers - Owl Ribbons Pink
$2.30 per sheet
Click here to order yours!
Also available in blue

Tuesday, October 16, 2012

Friends Like You Easel Card

This is a really cute card that we have available as part of the Spectrum Noir Monthly Kit - Red pens.
I thought it would be fun to show you how you can make an easel card so you can make you own, with or without your stamps.  These cards are really fun and really easy.

You will need:
One 4 1/4" x 8 1/2" piece of cardstock
One 4 1/4" square piece of cardstock (same as above cardstock)
One 3 3/4" x 1 1/2" coordinating cardstock
Scoreboard
Adhesive Tape

Optional: Stamps, inks

How To:

Score the 4 1/4" x 8 1/2" piece of cardstock at 4 1/4" and 6 3/8"


Prefold all score lines so your cardstock looks like this
Place cardstock on table with the 4 1/4" side down so it looks like this and add a couple of strips of adhesive tape.
Adhere the 4 1/4" square cardstock to the base of your card.  Line up the top of the square with the top of the 2 1/8" x 4 1/4" section.  This is what your card will look like from side one.
Adhere your 3 3/4" x 1 1/2" coordinating cardstock to the bottom of the inside of your card.  This will help to hold up the easel part of your card.
Now you can decorate the front of your card and add a sentiment to the inside of your card that will show when your card is standing up.


Sunday, October 7, 2012

Classes This Week

We have two classes this week.

Children's School Holiday Workshop
Thursday 11th October - 9:30am-12noon

Come and join us for a fun morning of paper crafting.
Each child will complete two fabulous mini albums, one being a fun pop-up mini book and the other a nice mini book style album.
Your child will need to bring some photos, how many is up to them but at least five for each project would be great.  If they do not have photos that is ok too, as they can add photos later.

Cost is $25 includes all materials and morning tea.
To book email:  megan@betterscrapbooking.co.nz
Space is limited so be sure to get in quick with your booking

Card Making Class
Saturday 13th October - 10am-12noon


Come and join us for a fun morning of card making.  This would be an ideal time to come and make some Christmas cards for those that need to be sent overseas - be in early before the cut off dates for overseas Christmas mail.
You will learn how to make an easel card and a border punch card, but you should have time to make others as well.

This class is $30 and includes a card-making kit
To book email: megan@betterscrapbooking.co.nz
Space is limited so be sure to get in quick with your booking