
Monday, December 3, 2012

Sunday, December 2, 2012
Reindeer Noses How To ...


A piece of 1 7/8 strip of coloured cardstock - green
1 2" circle - a different shade of green
1 reindeer punch - brown
Score and fold your square cardstock in half, this is the base you will be building for your reindeer nose topper.


Enjoy and I hope you have as much fun making yours as I did with mine.
The chocolates that I used were Maltesers and Jaffas - YUM!
Remember you can have a treat whilst making these ... though just one or two (handfuls LOL!
Wednesday, November 28, 2012
Teacher Gifts
Seeing as this is the end of Grace's High School experience we decided that she should give some little gifts to her teachers and dean. Here is what we came up with. It was inspired from Pinterest, the pin board of inspiration for all crafters. Here are enough for two noses per reindeer (in case they need a spare one LOL!)

 So how many reindeer can you name?
Can you tell I like my reindeer punch LOL! What else can I use it on I wonder ...


Can you tell I like my reindeer punch LOL! What else can I use it on I wonder ...
Monday, November 26, 2012
Christmas Tags

Every year I like to hand make my Christmas gift tags. Usually I wait until I have some wrapped gifts ready for going under the tree. This year I have decided to try and be a bit more organised so I have made my gift tags already. I may have gone over board with the amount but I always seem to run out.
So here is what I did:

Very pleased with the way they have turned out!
Do you make gift tags for your Christmas gifts? I would love to see what you create. Feel free to share your tags with me.
Scrapbooking Layout Boy Discovers World by Jennie Coull
Here is a layout Jennie has created for our newsletter using the ScrapPack
 This is a video Jennie showing her creative process for this layout.

Scrapbooking Layout Dad by Jennie Coull
Here is a layout Jennie has created for our newsletter using the ScrapPack.
 This is a video Jennie created showing her creative process for this layout

Scrapbooking Layout 1st Day by Jennie Coull
Here is a layout that Jennie has create for this months newsletter using the latest ScrapPack.
 This is a video Jennie created showing her creative process for this layout.

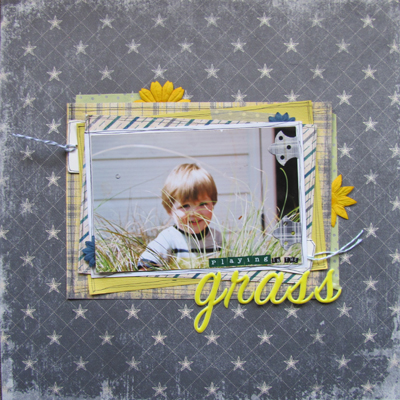
Scrapbooking Layout Playing in the Grass by Jennie Coull
Here is one of the layouts Jennie has kindly created for our newsletter using this months ScrapPack.
 This is a video Jennie created as she put this layout together so you can see how she did it and use some of this process to create a similar layout for yourself.
Wednesday, November 14, 2012
Diamond Fold Card Base

This week I have been having fun with this months Spectrum Noir Monthly Kit. This month we have been working with the set of blue pens. With this kit there was a really fun diamond folded card (the I made the base and included in the kits). I thought you would all like to see how to make this fun card. Truly it is really easy to make.

To make just the base of this card you will need:
1 piece of 4"x12" cardstock or pattern paper of your choice
Scoreboard
Instructions:

Place your strip of 4"x 12" cardstock or pattern paper onto your scoreboard so that it is long ways and score at 2",4", 8" and 10"

Mark on your paper where 6" is at the top and bottom of your paper

Take your paper strip off your scoreboard and turn in over. Take one side and fold so the top edge lines up with the 6" markings.

Now fold so the other half of the top edge lines up with the 6" markings and looks like the photo above.

Turn your paper 180 degrees and repeat the last two steps.

Turn your paper so the right side is showing and fold up at the 2" and 10" score lines Your paper will naturally want to start making the diamond in the middle now.

Pinch beside your diamond to help fold back the edges of the paper to define your diamond.

This is how your finished base should look. You can now decorate it wish plain papers and stamped images and other fun embellishments.
I would love to see what you create using this card folding technique. You can email through your photos to: megan@betterscrapbooking.co.nz
Happy card making everyone!
Graduation
It has been a little while since I have posted. Sorry about that, seems like we have been pretty busy with birthdays (still one to come this weekend), and life in general lately. We have had a special event that does not happen very often. Last week my eldest daughter graduated High School.
It felt so strange for them to be breaking up for the end of the year and for the end of year exams and to be having their graduation. This year has truly flown by. We have ... ok let's rephrase that ... she has been very aware this year was to be her final year at high school, but it still came to soon (for many of us).
I have to say I have been very impressed with our high school - Green Bay High School. We have had a very positive time there. I like that the teachers are more often than not, there for the kids. Wanting the kids to do their best. Having a really good variety of subjects available and willing to help accommodate students needs wherever they could.
Thankfully, my youngest daughter is having her first year of high school at the same school this year, so we have another four more (positive) years to come.


It felt so strange for them to be breaking up for the end of the year and for the end of year exams and to be having their graduation. This year has truly flown by. We have ... ok let's rephrase that ... she has been very aware this year was to be her final year at high school, but it still came to soon (for many of us).
I have to say I have been very impressed with our high school - Green Bay High School. We have had a very positive time there. I like that the teachers are more often than not, there for the kids. Wanting the kids to do their best. Having a really good variety of subjects available and willing to help accommodate students needs wherever they could.
Thankfully, my youngest daughter is having her first year of high school at the same school this year, so we have another four more (positive) years to come.

Grace receiving her graduation certificate.

Grace and her lovely form teacher of 5 years. Thank you Gail for everything.

Grace and her Dean Mr Woodward. Thank Mr Woodward for being available to all the kids over the past 5 years. We wish you all the best for the next year and all the challenges it brings.
Subscribe to:
Posts (Atom)