Pages

Showing posts with label Modeling Paste. Show all posts

Monday, November 10, 2014

Such a Busy Weekend - Love It!

It was the weekend of Craft Out West last weekend.  Yippeee!  Craft Out West is one of my favourite craft shows.  I think I like that it supports Hospice West Auckland.  I also really love meeting all the locals and getting to chat with lots of lovely people.
We had enough room with the wall behind us to have our sign up and some layouts and card ideas
Here is my table that I worked out.  Melissa and I made a great team!

Here is the stand for the Martha Stewart goodies and the EK Success Punches
This was the stand for the Spectrum Noir pens and lots of lovely stamps
And of course here I am getting ready for another great show!

Here are some photos of my stall at Craft Out West.  I was in a different spot this year.  Not sure if it was the different spot or that fact that the weather was so beautiful outside, but the crowds seemed quieter this year.

My daughter Melissa helped me for both days and she did a fantastic job of demonstrating the Martha Stewart Crafter's Clay and the border punches.  I on the other hand was demonstrating the Spectrum Noir pens, and the Teresa Collins modeling paste and templates.

The big surprise again this year was the popularity of the Dress It Up Buttons from Jessie James.  On Saturday in particular these just went crazy.  Mind you so many of the buttons are just too cute to pass up.

The craft show was from 10am - 4pm both days.  So after the show each day there was not much time to do much else but get ready for the following day and have dinner.  But on Sunday morning I was able to get out and water my veggie garden before the show.  Little did I know that there would be a wonderful surprise at the end of the day.

So after the pack down of the show and getting home, the front fence was completely finished and there was another beautiful looking garden bed at the top of the three I already have.  Also my bean seeds and corn seeds have sprouted - so excited.
My baby beans just starting to sprout!
On closer inspection I found these tiny corn seedlings had finally sprouted!

Tuesday, September 9, 2014

Stenciling with Stencils

Ok for one of the challenges this month, it asks for you to use a stenciling technique on your layout.  I have had a couple of people asking what stenciling in scrapbooking is, so I thought I would do a quick blog post of some stenciling ideas.

To start off with there are many stencils available out there from the alpha stencils we used as kids to the fancy alpha and shape stencils available in scrapbooking and card making today.

With stencils you could use them to trace the image with your pens - this you might like to do for a title.  But more fun techniques are using things like ink, spray ink, acrylic paint, modeling paste and chalks.

Here are a couple of layouts that I have used stencils on.

This layout used the cutout from inside the stencil to
create a make and inked over using an ink pad

This layouts title was traced from a stencil

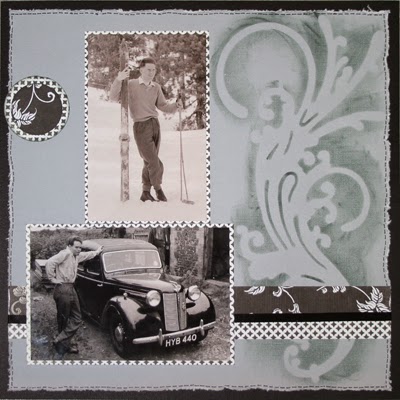
This layout used a stencil and modeling paste over
the whole background of the layout

On this layout I used the modeling paste and a stencil for the
border and then sprinkled glitter over the top

On the layout I used the stencil and spray ink to create
 the look of the chicken wire background.
So I wonder what you will do with a stencil and your layout challenge.  Remember, if you do not have a stencil you can make your own using die-cut machines and or shape punches.

Have fun and let me see what you create.


Sunday, May 25, 2014

Creative Adventure Downunder

I have just the BEST weekend.  Three days of scrapbooking, papercrafting, inspiration, making new friends, learning new techniques and having great fun.

Oh my goodness I am still buzzing from all the fun from the last couple of days, so much to share not really sure where to start.

I will be honest I was a big worried about getting to Ellerlie for 8am on Friday morning with all the traffic, so I left home at 6:45am.  There was traffic but not heavy enough anywhere to be actually stopped.  So I cruised through Rosebank and Avondale down to Waterview where getting on the motorway was slow but again not too bad.  Once on the motorway I just needed to be sure I was in the correct lane to get onto the Southern motorway.  The Southern motorway was flowing smoothly so made it to the Ibis Hotel in Ellerslie and parked by 7:15am - WOW!  Really early, what was I worrying about again LOL!

Once inside I registered and was keen and excited about the whole event. I met up with one of my ladies that gets my emails and we sat together with some friends of hers and by the end of the day we were all like old friends - thanks ladies (Sheree, Cathie and Irene)

My first class was Friday morning with the lovely Joey Guercio Otlo from Bazzill Basics.  We made a fun double layout and card (still have two cards to finish) using the stunning Vintage Lace collection.

 Joey was such a beautiful and vibrant teacher.  It was fun to hear that she and I have daughters the same age - such fun!  It was really nice to be able to create a fun girly page, though when I was choosing my photos I realized I don't have that many girly photos - a challenge for me now is to take more girly photos.  I was really pleased with my layout and box closure card.
Here is a lovely photo of Joey and I after class.

My next class was Teresa Collins Pocket Page album class which was a lovely 6 hour class - we did have some breaks.  Poor Teresa did not have her samples or tools for our class due to issues with her luggage and flights - they did arrive in time for the other group for their class with Teresa - but that was OK, it was just wonderful to have Teresa teaching and sharing with us.  I love Teresa's classes
Here is my table working on our Teresa Collins Pocket page album and look there is Teresa teaching in the background.
This class was a real challenge with all the pockets but I rose to that challenge and was very pleased with the result.  I can see I will be incorporating this form of scrapbooking with my usual pages as well.  Loved all the ideas for decorating pockets.

One of the things we did do during this class was use some gold spray paint - we all know how much Teresa loves gold things.  So we went outside with the gold spray paint and some boxes so as not to create a mess in the hotel conference room but in bringing back all our sprayed items the fumes followed us.  Suffice as to say we all seemed to get extra happy with those fumes, well not really but it was kinda funny.  It was a fun way to change things and bring in that gold look to the project.
Here is a brief look at one of the pages I did during this class.

Also during the class Teresa was giving out prizes - always fun and guess what ... I won something ... I won a packet of her beautiful sequins - these will certainly be using in more of these albums.  I loved how we used them with the pockets to create floating embellishments.

We had until about 6pm for this class but we all started hitting the scrapbooking wall just after 5pm.  I kept going for about another half hour before my brain just gave out.

We had a Friday night dinner and entertainment which was a 70's theme.  Lots of people really got into it with their costumes.  I ran out of time to put anything decent together but it was great to see people really go all out.


Dinner was nice this year and the entertainment was a good laugh.  We were graced with a performance from the Abba-ettes (Larissa, Michelle and Michele)  Thank you ladies for a fun performance and a good laugh.  It was just after this that I had to go home as I was just so tired, but apparently there was a lovely dance put on by Michelle's daughter and then some fun make'n'takes with Graphics 45 and Teresa Collins - such a shame but I was really beat.

The following day, Saturday I was lucky enough that my wonderful Mum have me a ride to Ellerslie due to Brad needing the truck to take Grace to her Zumba class on the North Shore.  Thank you Mum for your help getting me to CAD on Saturday morning. Though in my haste to get to CAD I did forget my cutting mat and phone (camera) but I made it work LOL!

Day two was just as full on with two wonderful classes with Graphics 45. We had the mother and daughter team Diane Schultz and Aimee Filimoehala from Graphics 45 - what an inspiration these ladies are and oh so elegant.

We started of with a beautiful little ATC box and cards.  This was so much fun.  I loved working on this project.  Not only was it cute but I loved working with the metal embellishments.

After morning tea we started this lovely little Tea Album from some fun tags.  This was a full on class and we didn't quite finish the project.  I did have a bit of time at the end of the day with Irene to finish of some bits for this class and finished putting the album together at home that night.  I love the way it all came together.
Thank you so much Diane and Aimee for these two stunning classes and all your beautiful products

Saturday afternoon I had another fun class with Joey from Bazzill Basics where we created a funtastic little travel book.  Not that I travel but maybe one day when I get to travel I will be able to use it.  This was a fun class as this little book had lots of fun flip pages and pockets.  I also liked the use of a poly-envelope.
Also during Joey's class she gave away some amazing prizes/gifts to everyone.  I recieved a lovely pack of Bazzill cardstock, a sheet of stickers, a packet of metal tags and a packet of chipboard antique frames.  Awesome!

It was this class that we just rocketed through and finished early.  It was also nice in that Brad and the girls picked me up at the end of the day so I brought Grace and Melissa through (to help me carry my bags) but they also were able to meet Joey.

Day three, Brad and the girls dropped me off as Brad need the truck again to take Grace to another Zumba class where she was filling in for someone at Contours Albany.  Anyway, I was doing better on Sunday as I remembered my cutting mat and I also borrowed Melissa's little camera for the day.

For my last class was the 3 n 1 layout class with Trina McClune.  I have never done one of Trina's classes before so was very excited.  Trina you are a beautiful person and I did enjoy your class.  

However I was only able to finish two out of the three layouts during the class.  Both the layouts I did complete were using Teresa Collin's modeling paste and templates so that was fun.
Again Trina was giving away a couple of prizes and this one was a draw using raffle tickets and as she was doing the draw I jokingly said and its number 9 and guess what ... it was ... I won!  So exciting!  The whole class gave a cheer - cause that is just what you do when someone wins.  Then the class next door were cheering so we did it again and we had a little cheering contest between classes - my class won!
Here is a picture of all the beautiful things I won over the weekend.  Thank you to everyone!


It was sad to finish the day but this was a fantastic event. But here are some pics of some of the wonderful friends I made


This is a photo of the pink team of ladies and our wonderful teachers.

Wednesday, April 9, 2014

Colouring Modeling Paste


I wanted to share with you a project I created on the weekend where I used some more of the Teresa Collins Modeling Paste - I am really loving this and adding texture to my projects.
I thought it would be fun to add a bit of colour so here is what I did.
I started with a blank canvas - this canvas is one of those flat ones.
Next I used some really fun spray inks.  I used three different makes and colours, Heidi Swap Colour Shine, Tattered Angels glimmer mist and my own home-made spray ink.
I sprayed all over the canvas, now because the surface of this canvas has been treated with Gesso (like most bought canvas') the ink did not seep into the canvas but rested on the top, so to dry it I used my heat too.  Love the effects I got with the blending of the inks, even the splotches look cool.
Next I grabbed one of my 6"x 6" Crafter's Workshop Templates and added some modeling paste just in white.

Then I wanted to add some colour to my modeling paste.  So I added some of the paste to a little plate, then using the spray ink that I used on my canvas I sprayed some colour to the modeling paste and mixed it together a bit.  Now because I had added some extra liquid to the paste it was a big more soft, almost sloppy so be careful how much ink you add.
I used two different templates with the coloured modeling paste, I used the Teresa Collins Scallop 12"x 12" stencil and a small journaling stencil for a last bit of interest in the bottom right corner.
Before drying the modeling paste with my heat tool, I went and washed all my templates, just with cold water and my fingers.
When using your heat tool to dry modeling paste be careful as some heat tools are too hot and can cause modeling pastes to start to bubble.  I also left this to dry overnight.
The following day I added some punched shapes using my Martha Stewart layering punches and a little bit of bling.  I am really pleased with the results.

I would love to see what you create with colouring some modeling paste for your next project.  Please leave a comment below and let me know what you think of this fun wee project.

Tuesday, March 18, 2014

Glitter and Modeling Paste

I thought it would be fun to have a look at working with glitter and modeling paste.
Modeling paste and stencils are proving more and more popular, so let's try something a wee bit different and glitter on top and into modeling paste and see what we get.

We will start with adding glitter on top of the modeling paste.
So you will take your cardstock and add your stencil on top.  I taped mine in place with some removable tape, you could use washi tape.

 I am working on my Bazzill Splatter mat for easy clean up.
Next add your modeling paste, I chose to just add it down the right edge of my blue cardstock.  If you are not doing the whole stencil it can be fun to leave some half pasted shapes (it looks almost like torn paper).  As you can see I have removed the stencil so you can see the result.  Place a piece of scratch paper under the stenciled edge ready for glitter.
For this step you do need to move a bit quickly as the modeling paste is starting to dry.  Take your choice of glitter - I chose gold - and sprinkle it on all over the modeling paste.  Do not use your finger to spread the glitter as you will smoosh the modeling paste.
When you are happy with the coverage, gently slide the excess glitter onto the scratch paper and put it away.  Now leave the glitter and modeling paste to dry.  You will find that your cardstock will curl but the modeling paste is meld-able enough to gently straight back up.
Lastly have fun creating your layout.

Now lets look at adding some glitter too the modeling paste.  For this you will need a dish to mix your paste and glitter on.
Add a good dollop of modeling paste and then add a good dash or three of glitter.  Then mix thoroughly using your palette knife.
You will end up with something like this.
Next prepare your cardstock, add your stencil.  Then start applying your modeling paste.  As you can see you do not need to cover the whole stencil you can do just areas you feel will look good for your finished layout.  Enjoy the process of smoothing out the modeling paste.  It is a good idea to try and use up the modeling paste that has the glitter in it as you will not want to put it back in your modeling paste jar.
Remove your stencil and leave to dry.  The glitter does not shine through like when using the other technique but it does give quite a fun speckled look.
Once dry create your layout.
Here is a close up where you can see that speckled look with the glitter and modeling paste.

I hope you enjoy giving these two techniques a try with your modeling paste.
Remember to clean your stencil as the modeling paste does try quickly.  Just pop the stencil in a basin of water (be sure the water covers the stencil) until you are ready to clean it.

Tuesday, March 4, 2014

Working with Modeling Paste

Oh my goodness I really love the Teresa Collins Designs modeling paste.  I would never have thought that I would be into this sort of messy creativity but wow it is so much fun.
The paste is so smooth and easy to apply.  When Teresa Collins was saying it is like icing a cake I thought, nahh.  But honestly, it is easier than icing a cake.  You just take your time and have fun with it.

Ok I may not suggest that your first attempt be to create a whole 12x12 background like I did, but that is where I started and I am pleased with the results.  It does take a bit of time to dry but you can help it along with your embossing heat tool if you like.

Here is my layout I created using the modeling paste for the first time.
I would suggest that when doing a large area with modeling paste that you use one of the longer palette knives.

We met Marcus at the Auckland airport on his visit to New Zealand on New Years Day this year.  What a great way to start the year making new friends :)

So what will you create with modeling paste and stencils.